Anyone who has been on this site recently will know I’ve been playing around with a lot of little JavaScript and Canvas experiments. I’ve had fun porting some of my old Flash stuff over to Canvas and some of them have generated a fair bit of interest with my HTML5 ColorWall featured on Chrome Experiments (go and vote for it!) and my Simple JavaScript Physics post getting a lot of hits.
One thing I’ve found frustrating is how poorly these experiments run on iOS, especially before the recently released iOS5. Apple are against adding web plugins, such as Adobe Flash, to their devices claiming people should be using HTML5 tags such as Canvas. However, constantly clearing and re-drawing to a Canvas element on an iPhone running iOS4 gives you about 3 or 4 fps (it’s slightly better on iOS5 but still not good enough to write a game).
I then stumbled across this article on Seb Lee-Delisles site about a JavaScript hack day they held at Plugin Media where they made the infector game using CSS and JavaScript to see if they could get a fast browser game running on iOS. Inspired by this and wanting to learn a bit more CSS/JavaScript I decided to try putting my own game together using the same techniques. This post will explain how I went about it and stuff I learnt.
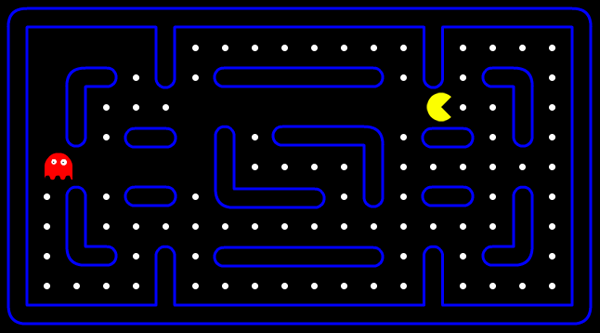
Before I continue I should mention that this isn’t a full version of Pacman, it’s merely a prototype to see if I could get a browser game working smoothly on an iPad and other touch devices. I never intended to finish it fully as I feel the world already has enough Pacman games floating about and we don’t really need another one. I am planning on creating a more original game with a Designer friend of mine early next year and will post about that when it’s ready.
First up click here to play the game. Right click and have a glance over the source code then read on below and I’ll explain the main talking points of the game structure.
Moving and animating the characters
The movement of the characters is fairly simple. The Player and Ghost Classes (I’m going to call them Classes even though they aren’t strictly Classes, not in the way AS3 Developers would be used to anyway) both contain an instance of the Animation Class. This Class was adapted from the Plugin Media experiment and basically uses CSS transforms to position the game characters as seen in the code below. I updated the Class so it also incorporated rotation, which I needed for my Pacman game.
var xp = Math.round(this.x + this.offsetX);
var yp = Math.round(this.y + this.offsetY);
styleStr = "translate(" + xp + "px, " + yp + "px)";
dom.style.webkitTransform = styleStr;
dom.style.MozTransform = styleStr;
dom.style.OTransform = styleStr;
dom.style.transform = styleStr;

styleStr = "rotate(" + this.rotation + "deg)";
dom.style.webkitTransform += styleStr;
dom.style.MozTransform += styleStr;
dom.style.OTransform += styleStr;
dom.style.transform += styleStr;
The character animations are done using simple Sprite sheets as seen below.

I liked the way Plugin Media wrote their Animation Class so the API worked in a similar way to ActionScript with play(), stop() and gotoAndStop() functions. View my adapted version of the Class here.
Collision Detection / Level Generator
The hit detection for when Pacman touches a wall is actually very simple. The level background is a transparent png as shown below.
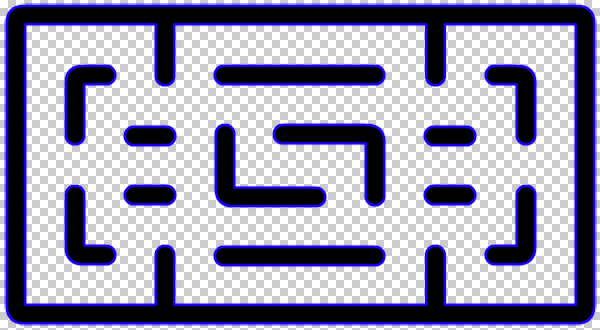
I create a Canvas element and give it a green background. I then load the image on top of it, divide the image up into a grid and loop through to check if the pixel color is green using getImageData with the canvas tag. If it is I know it’s a space, otherwise it’s a wall. From this I can create an Array with info on the level and I use this throughout the game.
To see the full Level Class where this Array is generated click here. You may remember me criticising the performance of the Canvas tag and be wondering why I am using it. It only performs badly when you are constantly clearing it and writing to it. Once graphics have been written to Canvas it’s performance is no better or worse than simply loading an image.
If you have downloaded the source and are running it locally you may find that it doesn’t work and you get a security error. That is due to the line of code below – getImageData. You won’t get this if you install and run a local webserver such as Apache – this post on stackoverflow will explain further.
cellData[w][h] = (context.getImageData(xp, yp, 1, 1).data[1] == 255) ? 1 : 0;The second bit of collision detection is between Pacman and the Ghost. This was much simpler and is done using a distance calculation.
var dx = Math.abs(player.xp - ghost.xp);
var dy = Math.abs(player.yp - ghost.yp);
var dist = Math.sqrt(dx * dx + dy * dy);

if(dist < CELL_SIZE)
{
  onGameOver(false);
}
For the Ghost AI I have written a simple implementation of the good old A* algorithm. Keith Peters wrote a great chapter on pathfinding in his ActionScript 3.0 Advanced Animation book, which is well worth a read if you’re completely new to pathfinding. A* is by far the most used pathfinding algorithm. You’ll find it being used from simple games like Pacman right up to complex PS3/Xbox games. You can see my implementation in the updateGhost function within the index.html source.
Touch screen devices
For the touch screen controls I used Modernizr to detect if the device supports touch.
if(Modernizr.touch)
{
  isTouch = true;
  makeControls();
}
Then I create onscreen controls using divs and the HTML touch events. I combined the event listener for key presses and touches as shown below.
function onKeyPress(e)
{
  if(!isPlaying && !isKeyDown) onClicked();
  isKeyDown = (isTouch) ? (e.type == "touchstart") : (e.type == "keydown");

  switch((isTouch) ? e.target : e.keyCode)
  {
    case KEY_LEFT :
    case leftButton :
      leftDown = isKeyDown;
      break;

    case KEY_RIGHT :
    case rightButton :
      rightDown = isKeyDown;
      break;

    case KEY_UP :
    case upButton :
      upDown = isKeyDown;
      break;

    case KEY_DOWN :
    case downButton :
      downDown = isKeyDown;
      break;
  }
}
Fixed timestep
The final issue I experienced was a noticeable difference in frame rate between certain browsers and devices. This is an expected issue when running game physics on an interval and there is a simple solution: fix your timestep! I won’t go too much into this as you can read all you need to know in this great article from Glenn Fiedler. I have written an implementation of what is described in Glenn’s article in JavaScript and the game now runs at pretty much the same speed across all browsers and devices, it’s just smoother on some.
So with a fixed timestep and using CSS transformations on divs rather than constantly writing to Canvas I have succeeded in creating a simple browser based game that runs at an optimum speed on an iPhone/iPad and across other devices such as Android phones.
Conclusion
I really enjoyed creating this and learnt a lot about JavaScript and CSS. Reading books/online articles is a great way to learn but sometimes you just need to get stuck into code, and what better way than to make a simple game.
I want to say a little thanks to Seb and the guys at Plugin Media whose code I used a bit of. Also, my current employers Specialmoves, who were happy for me to do a bit of work on the game during my downtime.
Go ahead and try it out on your phone and let me know if you have any issues. As always advice and comments are welcome so let me know what you think.